How to Track Revenue Contracts in Pivott

Adam Cowley
CEO

Key takeaways
- Start by logging expected revenue per vendor per month — this baseline is what everything else is validated against.
- Import actual payments from your accounting system in any format and align them with your expected figures.
- Assigning intended revenue periods to payments (rather than just transaction dates) is what makes accurate month-by-month matching possible.
- You haven't fully validated a revenue contract until all expected figures align with received payments.
Managing revenue contract tracking effectively is essential for accurate financial reporting and ensuring that expected payments are actually received. Pivott makes this process straightforward by giving you a structured way to track, audit, and validate incoming revenue. Here's how to do it in five steps.
Step 1: Record all your expected revenue
Before you can track payments, you need to establish clear expectations. Identify your revenue sources and log the expected payment amount per vendor per month.
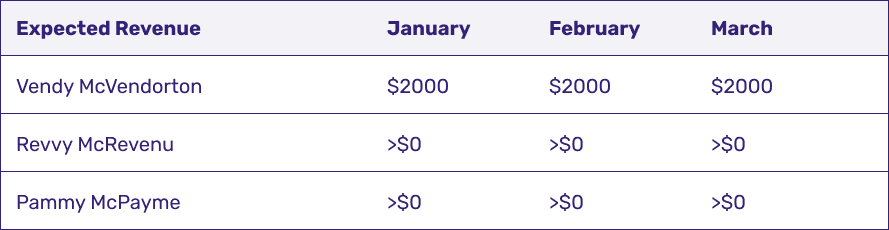
Putting expected payments into a table gives you a clear overview of anticipated revenue streams and creates the baseline you'll use to spot discrepancies in actual payments.
Step 2: Import your accounting data
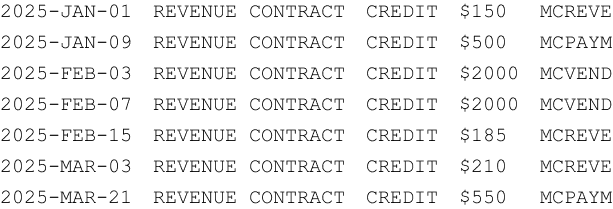
Your accounting system holds the real transaction records. Import all revenue contract payments — in any format — and align them with your expected revenue table.
Step 3: Conduct a quick audit
Once the data is imported, compare expected revenue against received payments. It helps to separate vendors with approximate expected revenue from those with exact contractual figures — each tells a slightly different story.
Some revenue expected

Here you can see that Revvy McRevenu is likely paying out as expected. Pammy McPayme, however, might have missed February's payment. You wouldn't jump to conclusions, but you'd watch closely next month. Averages matter here — if you don't know what to expect, any payment can look valid.
Exact revenue expected

The grand total is a good place to start. If you're short, you need to identify which month was missed — but accounting data alone won't get you there. That's where the next step comes in.
Step 4: Assign the intended revenue period
To accurately reflect expected revenue in Pivott, track when payments should be applied rather than just their transaction dates. This distinction is what makes month-by-month matching possible.
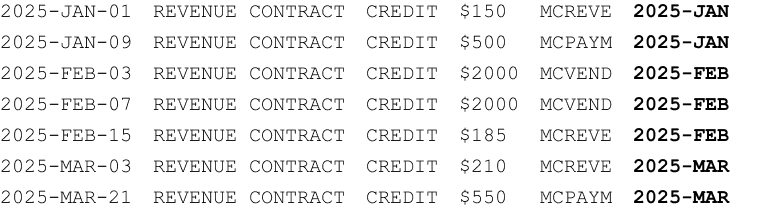
By adding the intended revenue period to each payment, you can now accurately match what was expected in a given month against what was actually received.
Step 5: Validate revenue contracts
With intended periods assigned, run the validation report to see expected revenue alongside payments applied to the correct periods.

Here we can see that Vendy McVendorton is on track for January and February, with the March payment expected shortly.
Final review checklist:
- If all values match expected revenue, your revenue contract tracking is complete.
- If discrepancies exist, investigate further before closing the report.
- Until all figures align, the revenue contracts are not fully validated.
Conclusion
Tracking revenue contracts in Pivott ensures that expected revenue aligns with actual payments. By recording expected revenue, importing accounting data, auditing at a glance, assigning intended periods, and validating contracts, you can confidently monitor financial performance and quickly identify payment discrepancies.
This structured approach helps maintain financial accuracy, improve cash flow management, and ensure contractual compliance across your portfolio.
Ready to automate?
See how Pivott helps multifamily teams manage contracts, compliance, and vendor documents in one place.
Book a demo